How to configure the Domotz IT Glue integration
Domotz network management software includes an integration with IT Glue documentation software.
The Domotz IT Glue Integration streamlines the documentation of networks by automatically sending the device and network details discovered by Domotz to IT Glue, and vice versa synchronize the Configurations into the Domotz Device entities.
Domotz will discover devices and device details such as model, MAC address, location, zone, software version, IP addresses and more and automatically send these details directly to IT Glue.
This integration with IT Glue allows you to synchronize the following data between Domotz and IT Glue:
- Domotz Agents and Devices – When using the Selection Mode (per device plan), only devices listed as Managed will be pushed and kept in sync.
- IT Glue Organizations and Configurations
Learn more about the Domotz integration with IT Glue documentation management IT software.
- How to configure the Domotz IT Glue integration
- On IT Glue: How to set-up the Domotz IT Glue integration
- On Domotz: How to set-up the Domotz IT Glue integration
- How to associate Domotz and IT Glue Items
- How to remove the integration between Domotz and IT Glue
On IT Glue: How to set-up the Domotz IT Glue integration
Before starting to connect an integration, you need to generate an API Key following these steps:
- Login to your IT Glue dashboard
- Select the API Keys tab from the section Settings -> Account
- Click on Generate API Key to generate a new API Key to configure the IT Glue integration on Domotz
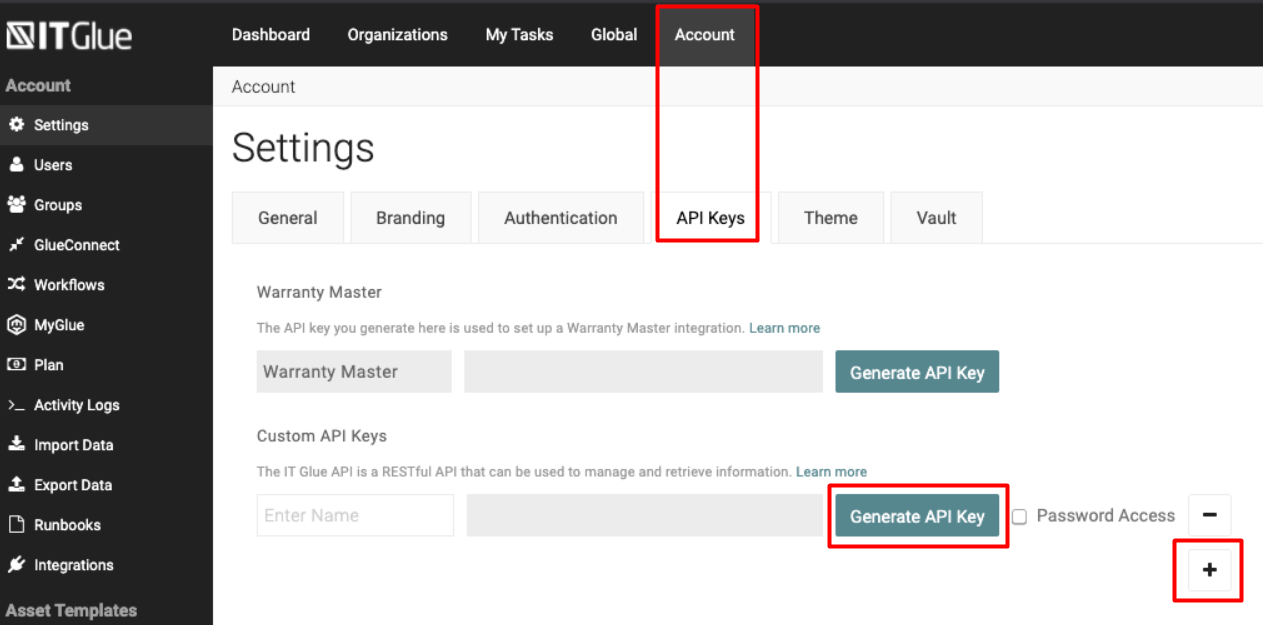
Keep track of the API Key generated, which will be used in the next step.
On Domotz: How to set-up the Domotz IT Glue integration
- Login to your Domotz portal
- Select IT Glue from the list of available documentation services

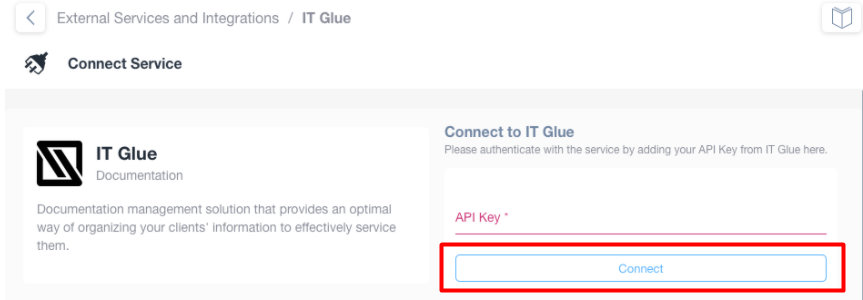
4. Insert the API key generated on the IT Glue dashboard and then click on the Connect button:
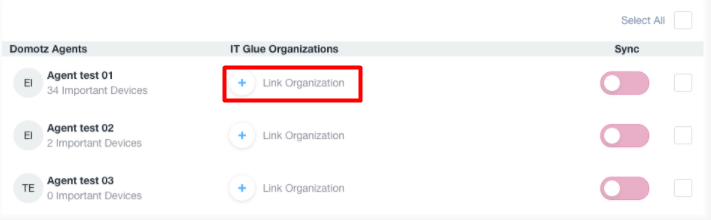
5. After the API key validation, you would see the following page with the list of the Domotz Agents available to link with the IT Glue Organizations:

Note: Expired agents or agents granted by the collaboration system won’t be shown on this list.
How to associate Domotz and IT Glue Items
In this section, you can match Domotz Agents and Devices with IT Glue Organizations and Configurations.
How to link a Domotz Agent to an IT Glue Organization
To link a Domotz Agent to an IT Glue Organization, click on the + button under your IT Glue Organizations list:
A pop-up window will appear where you can select the IT Glue Organization you would like to link to a Domotz Agent:
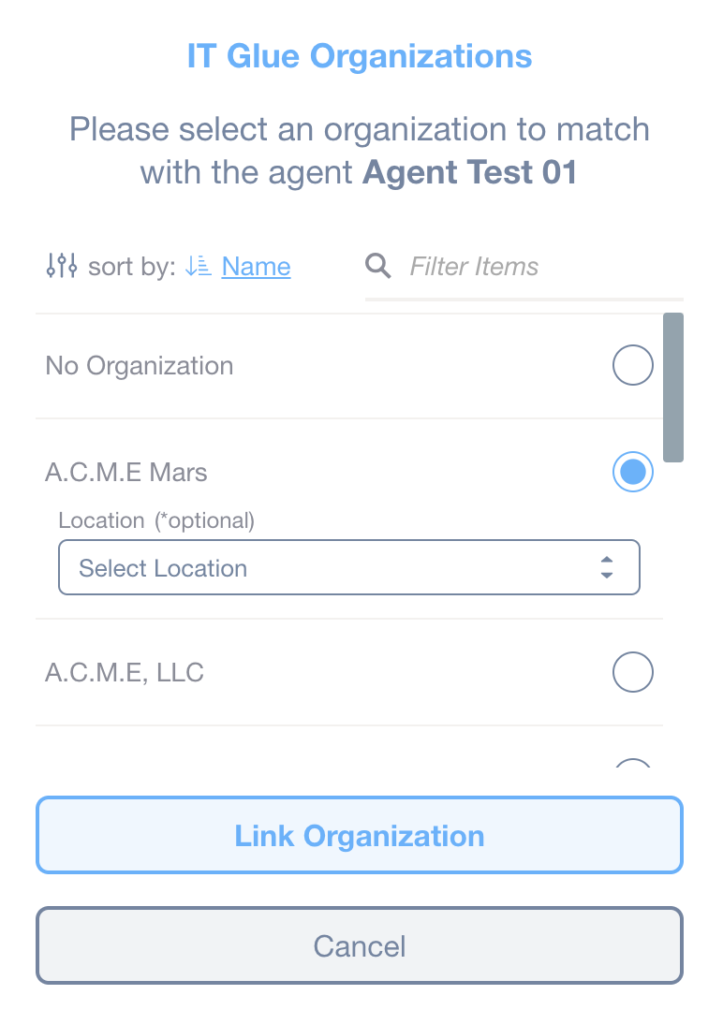
If you want to set the Location for this specific association, choose Select Location and then click on the Link Organization button.
Setting the location is optional and you can change it at any time.
The pop-up window will be closed and after few seconds the information about the linked Organization will be shown, including the number of Domotz Devices matched with the IT Glue Configurations:

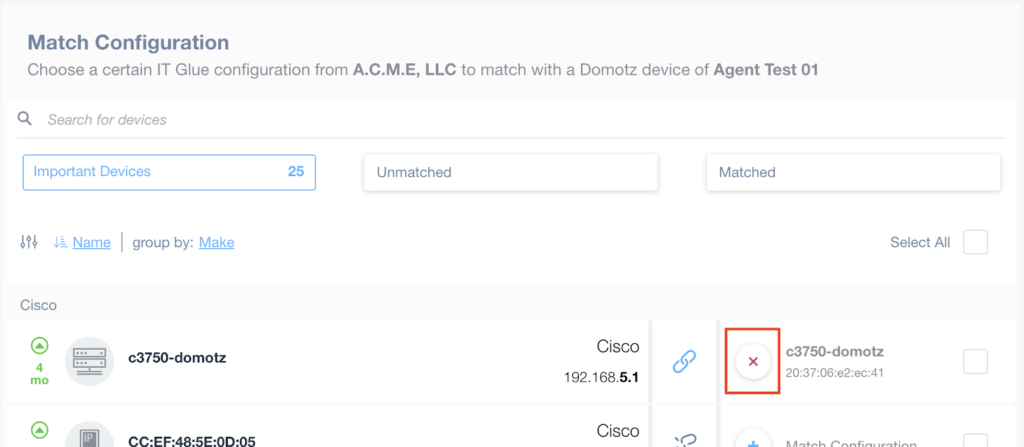
How to manage the matching between Domotz Devices and IT Glue Configurations
In this section, you can link or unlink Domotz Devices and IT Glue Configurations.
Match the configuration
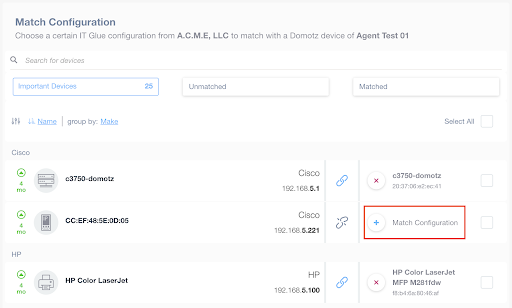
- To manually match a Domotz device with an IT Glue configuration, click on the number of matched devices:

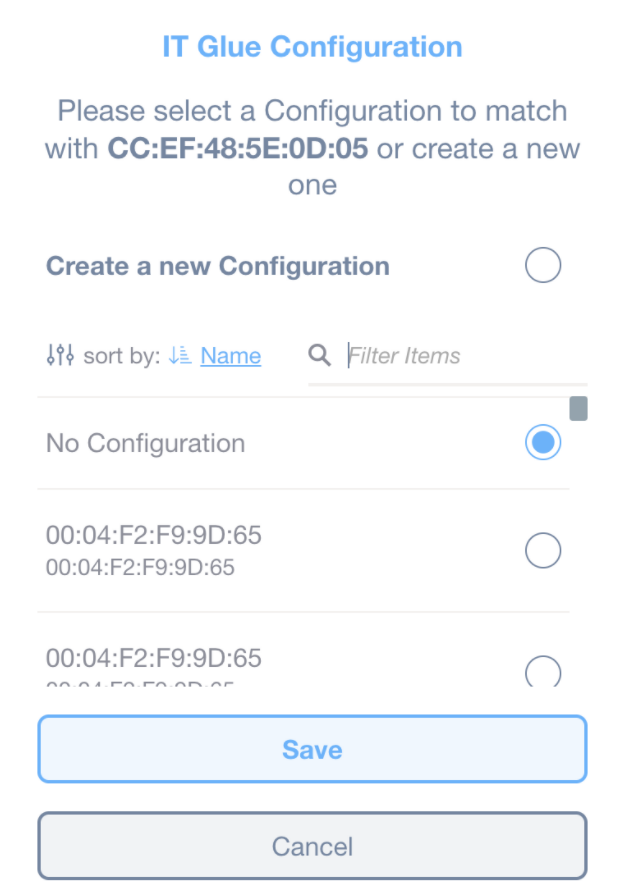
A pop-up window will appear from where you can create a new IT Glue Configuration or select an existing one and then link it to the Domotz Device:
- To allow Domotz to link the Domotz Device to a new IT Glue Configuration (created by Domotz itself), select Create New Configuration and then click on Save.
- To link the Domotz Device to an existing IT Glue Configuration, select it from the list and then click on Save:
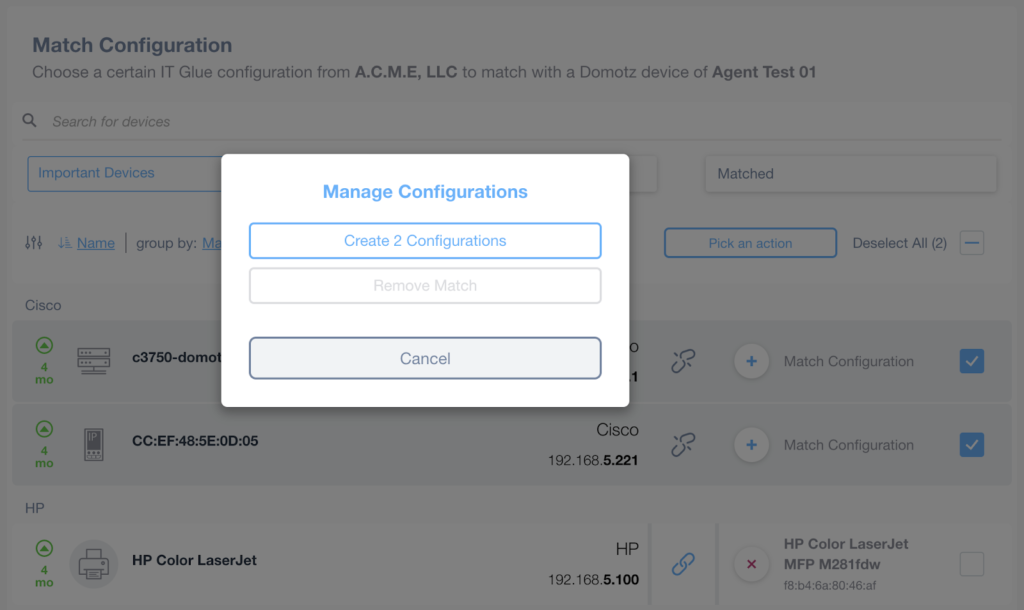
Bulk creation of IT Glue Configurations
In case more than one IT Glue Configuration has to be created at once, for example, if Domotz is used to set up an IT Glue Organization from scratch, the operation can be sped up using the multi-select option next to each row, and the Pick an action button.
Unlink the configuration
To manually unlink already matched Configuration:
How to set up the synchronization
In this section, you will learn how to set-up the synchronization manually or automatically.
In addition, we’ll cover how to define the synchronization direction between the Domotz Agents and the IT Glue Organizations for each field.
Manual Synchronization
To start the manual synchronization, select the desired Agent and then click on the Sync now button:
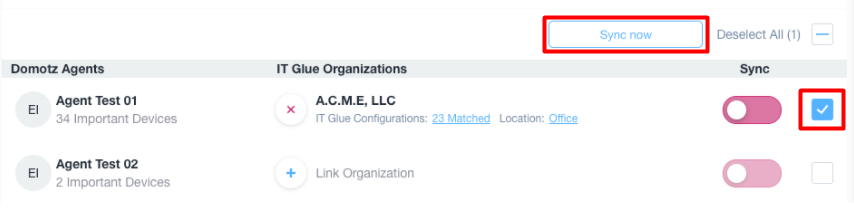
Note: Only a Domotz Agent already linked to an IT Glue Organization can be selected.
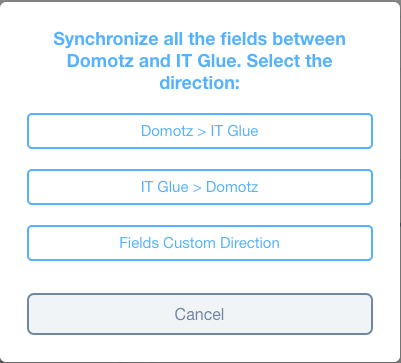
A pop-up window will appear where the user can select the direction of the synchronization between the Domotz Agents and Devices and the IT Glue Organizations and Configurations.
The user has the following options:
As soon as the user chooses an option for the synchronization, a message In progress will appear next to the Organization name.
- In case of success of the synchronization, the system will display Last Sync time:

- In case of an error during the synchronization, the system will display a message Failed Sync and the time of the last successful synchronization:

Note: In case of an error for the synchronization, we invite you to contact our Support team at support@domotz.com
Automatic Synchronization
The automatic synchronization occurs every 12 hours.
To enable the automatic synchronization, click on the toggle on the Sync column, then confirm the operation on the confirmation pop-up.

As soon as the sync toggle is enabled, a new automatic synchronization will occur within the next 5 minutes.
Note: In case of an error during the automatic synchronization, the system will display a message Failed Sync next to the organization name and the automatic synchronization will be disabled.
The automatic synchronization is only based on the direction specified for each field between Domotz and IT Glue.
The user can define the direction of the automatic synchronization from the Match Fields configuration section.
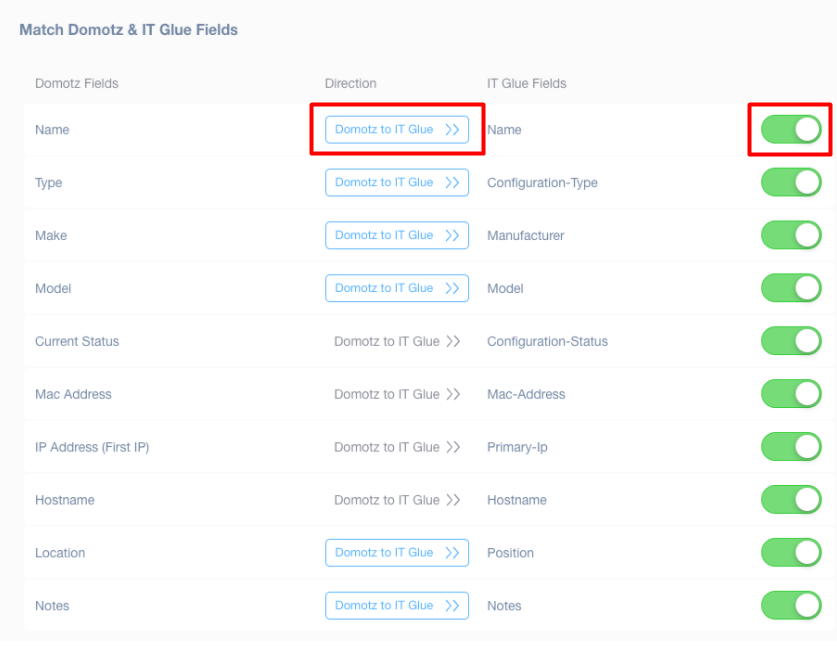
Match Fields configuration
In this section the user can define or disable the synchronization direction of every field:
- To disable the synchronization between the Domotz and IT Glue fields, click on the toggle on the right side of a desired field to switch it off.
However, some of the fields have their mandatory synchronization direction from Domotz to IT Glue: Current Status, MAC Address, IP Address (First IP) and Hostname, which cannot be changed:
How to remove the integration between Domotz and IT Glue
To completely disconnect the integration with IT Glue from Domotz, select the Manage Integration tab on the Services – IT Glue section, then click on the Remove Integration button and the integration will be removed:

If you have any questions or encounter any issues, please feel free to reach out to us at support@domotz.com. We’re always here to help!